Wednesday, October 19, 2011

Good Old Apple Pie

I've got my lard and I've got my apples from the local orchard.  My parents are driving in from the northern country today and my husband is itchin' for his favourite dessert.  I guess that means it's time to make some apple pie!  I pulled my lard out of the fridge and smiled.  As I scooped 1 cup of lard into the measuring cup, I was so excited to be using the lard that I had made, all by myself, from scratch!


I used the recipe from Pioneer Woman's site for the pastry, except that I had lots of lard and no butter, so I used all lard. 


Rolling out the dough proved to be more difficult than Pam makes it appear.  I followed her recipe exactly and deduced that I need to flour the parchment paper before rolling next time.  (I did, rather successfully for the top of the pie, which you will see shortly.)
The bottom crust was sorry-looking.  I patched it up a bit with extra bits of pastry and mended the thins parts as best as I could.  (Isn't it fun to see me crash and burn at this?  See Wanda.  See Wanda flop.  Flop Wanda, flop.)
Done with the hard part I went on to making the apple filling.  It's pretty simple.  Just cut up 6 big apples into pieces, throw 2 tbsp lemon juice and 1/2 cup each of white sugar and brown sugar in there.  And then realize that you're out of brown sugar... 

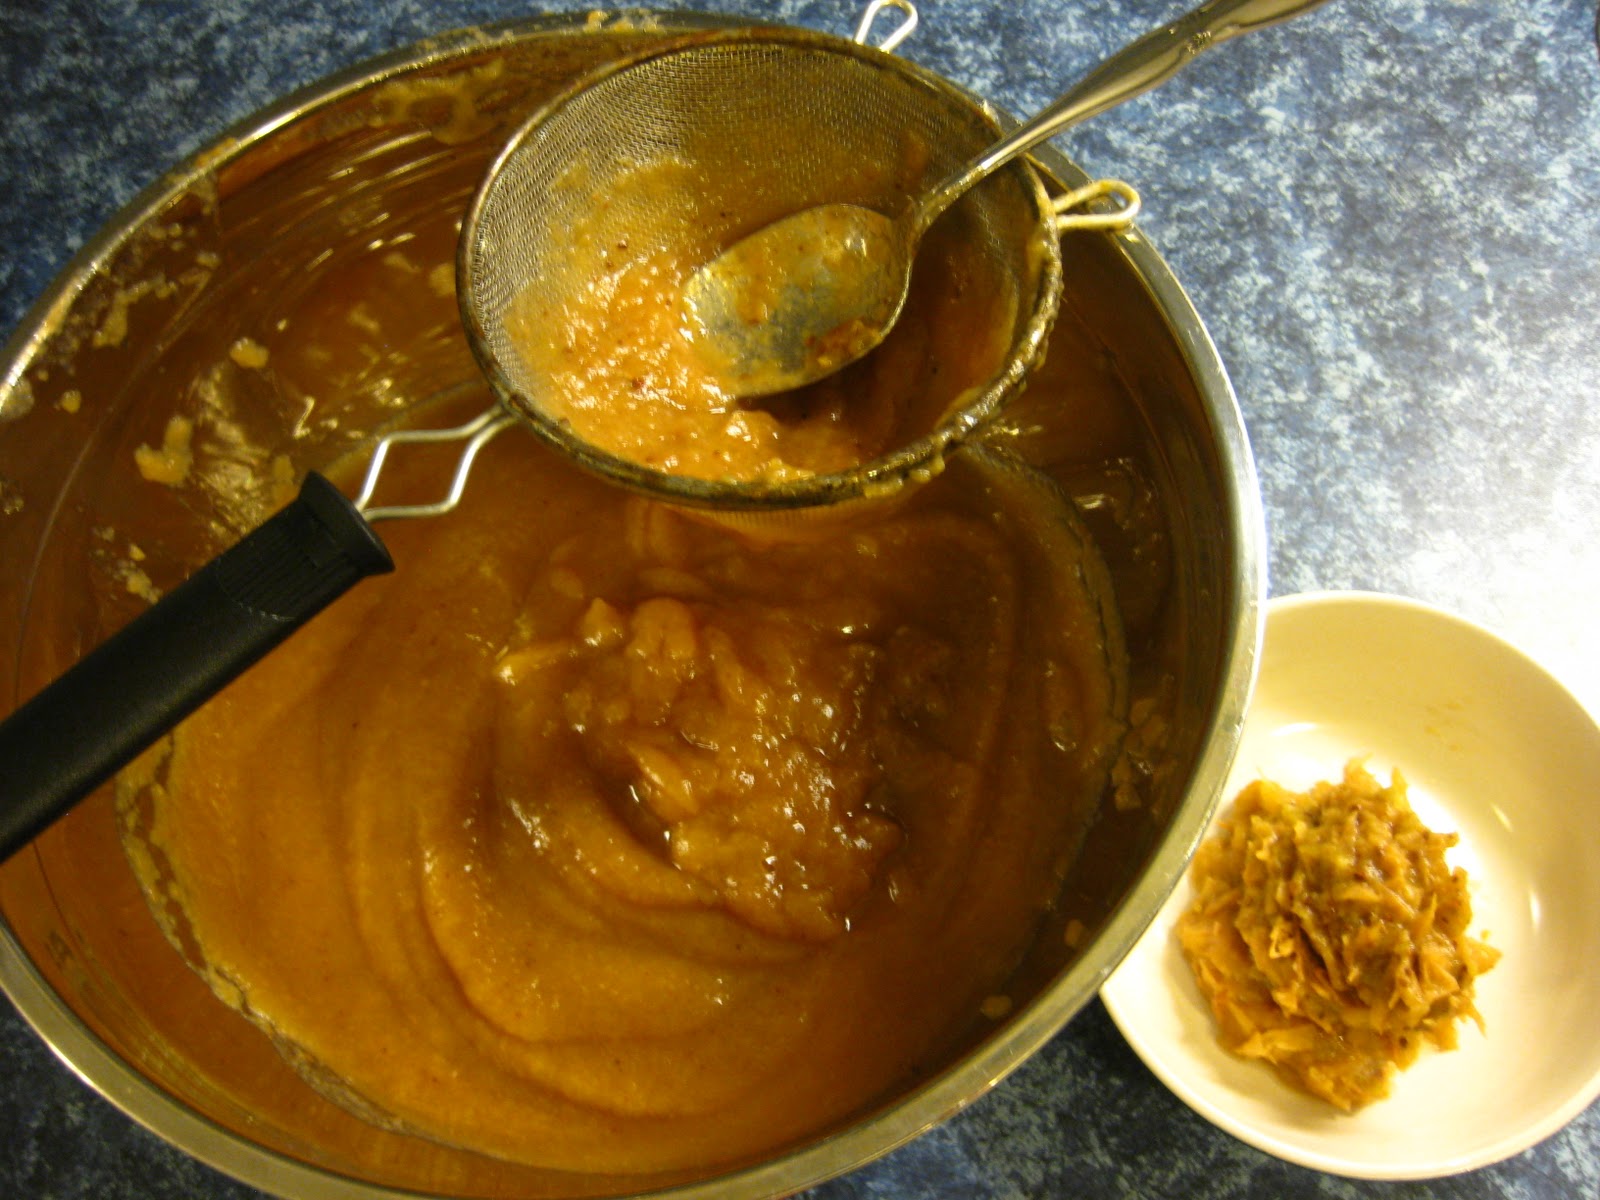
I've read many times that you can make your own brown sugar with white sugar and molasses.  I've always wondered if it works but never tried it.  I was just starting to wonder if the consistency would be affected and considered grabbing my keys for a quick run to the store when my fellow baker and scratch-loving friend, Moni, called.  I poured my worries onto her and she encouraged me to do the molasses trick.  I googled the ratio and found that 1/2 cup of sugar needs 1/2 tbsp of molasses.  I tried it...
...and I mixed it and it looked like brown sugar!
So I continued on with my pie filling.  I added 1/3 cup flour, 1/4 tsp cinnamon, 1/8 tsp each of nutmeg and allspice, mixed it all together and dumped it into the pie plate.  Miracle of miracles, it looked like my regular pie filling.  Moni's a genius.
 
I rolled out the second crust, much more successfully with a few sprinkles of flour, dotted the top of the pie with the little butter I had on my table, swept the tops of the edges with some water, and put the second crust on.  I chopped the perimeter so that it still had a little overhang for crimping.
I patched the areas along the edge that were a little short on pastry and crimped it all together nicely.  (I would not have been able to patch the crust before.  The parchment paper method definitely made a difference to the texture!)  A little more frilly work, a splash of sugar, and the pie was ready for the oven!
One thing to note when making an apple pie...  My husband likes them nice and full, so occasionally it will bubble over.  I always put an aluminum pizza pan underneath to catch any pie filling that bubbles out.
It baked for 15 minutes at 425 F and then I turned it down to 375 F for another 35 minutes.  In the meantime I needed to find something to do. 
Coming up empty, I grabbed a book and enjoyed it for a little while.  A couple chapters later - Voila!  A beautiful apple pie!
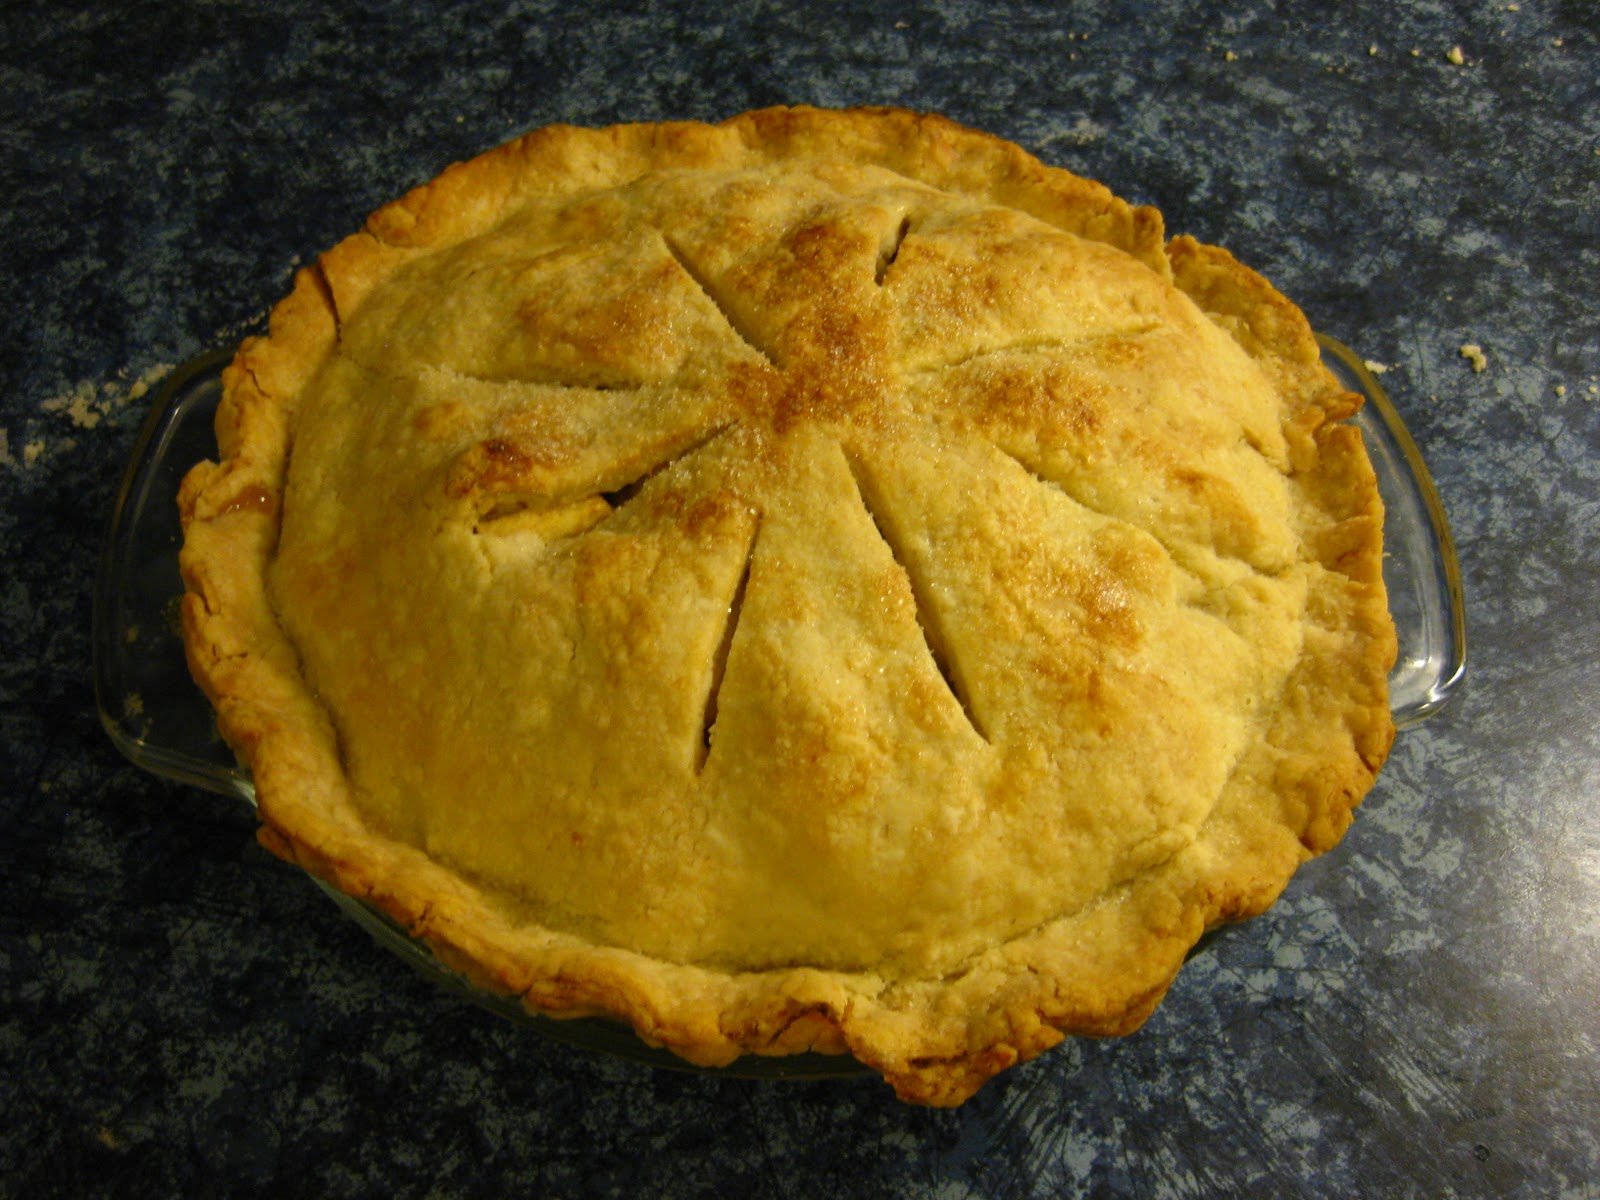
See!  Even when you mess up and are out of ingredients, you can still make some scrumptious!

Wanda’s Apple Pie

3 large tart apples (granny smith)
3 large sweet apples (Mac’s)
2 tbsp lemon juice
1/2 cup brown sugar
1/2 cup white sugar
1/3 cup flour
1/4 tsp cinnamon
1/8 tsp allspice
1/8 tsp nutmeg
2 tbsp butter
1 tbsp water

Preheat oven to 425°F
Roll out and place one crust in pie shell.
Peel, core and slice apples – ¼” thick. Sprinkle with lemon juice as you go.
Add sugars, flour, cinnamon, allspice, and nutmeg. Toss lightly.
Mound mixture in pie crust. Dot with butter.  
Moisten rim of pie crust with water and place top pastry on pie. Seal edges and crimp.
Bake at 425°F for 15 minutes. Lower to 375°F and bake for 35 minutes more.

Tuesday, October 18, 2011

Apple Butter!

My cousin and I introduced my baby sister to Cracker Barrel (a foreign restaurant, which can be found in the United States) a couple weeks ago.  We enjoyed the Apple Butter so much that I bought some and imported it home to Canada.  Never one to settle for enjoying what someone else made, I set out to make some that tasted as scrumptious as the Cracker Barrel Apple Butter.

My desire to make apple butter directly coincided with the weekend that we chose to take our kids apple picking.  We convinced the grandparents to join us and we all had a blast picking a bushel of apples and eating a few more.  We chose Mutsu and Golden Delicious since they only had three kinds of apples left and we didn't need more Macs.


 Once we got the apples home I cut and cored a bunch of them (maybe 10), then threw them into the crock pot with about 1/2 cup of apple juice.  (The juice was to let them get a good start on cooking and not burning.)  I left them in there for a couple hours...

 I stirred them a bit and let them cook a couple more hours...
 After a little more stirring and cooking, they were ready to process.
 I pushed the apples through a metal sieve to get the skins out of the mix.


 And I was left with a nice smooth apple puree, minus the puree part.  I had initially wanted to do a sugar-free apple butter, but since Golden Delicious are a little tart, I decided about 1/3 cup of brown sugar was in order.

 I added some cloves and a cinnamon stick and let it cook for another 6 hours or so and then I got this beautiful, dark apple buttery goodness...


The kids came home from school and sampled the apple butter...

 It's a hit!  The kids loved it and I've now got a few jars of it waiting to go into my pantry.  I can check another first off my list - I've made apple butter!

Wednesday, October 12, 2011

Greased Up and Ready to Bake!

One thing my friends, family, acquaintances and children's teachers know about me is that I love to bake. My favourite things to bake include the perfect chocolate chip cookie, melt-in-your-mouth cinnamon rolls, chewy & fudgey brownies, and soft & delicate cupcakes.

My husband does not appreciate those desserts. He loves apple pie. It is his favourite dessert. Since I love my husband and feel compelled to bake for him every so often, I set off on a quest to find a great pastry crust. In my search, I came across this page from The Pioneer Woman's website. The long and short of it is that leaf lard is the best lard for making a pie crust. If Ree Drummond and her friends say that leaf lard is the best, then I needed to get some.

I don't know how things work in other countries, but here in Canada, I can't just go to the grocery store and pick up some leaf lard. After asking several people who should know, I googled it. It turns out that leaf lard is actually the fat of a pig, taken specifically from the pig's kidneys. This is supposed to be the best fat to use for pastries as it has the most neutral taste. My search led me to realize that I needed to make my own leaf lard. How in the world does one make leaf lard???

After more searching I put together a few ideas and set out to make my own lard. Here is my process:
  1. Call butcher and ask for the fat to make leaf lard.
  2. Explain to the butcher what fat you need to make leaf lard.
  3. Call back to ask if the leaf lard is in.
  4. Explain to the new person what leaf lard is.
  5. Go in to the butcher shop to pick up fat for leaf lard.
  6. Explain once more what leaf lard is.
  7. Find out that there is no leaf lard in the store.
  8. Go away for a weekend.
  9. Let your husband get the call to pick up and freeze the hunk of pig fat he now owns.
  10. Thaw fat and cut it into chunks.
  11. Put chunks through meat grinder of food processor.
  12. Realize that your husband took the camera and you can't take any pictures.
  13. Put ground fat into a large, oven-safe pot and let it heat up at 200 F.
  14. Pour melted fat through cheesecloth into a clean bowl.
  15. Pour strained, liquid fat into canning jars.
  16. Allow fat to cool.
  17. Pat yourself on the back because you just made leaf lard!
I recommend you skip a few of those steps. Since this was my first time, I'm certain I'll be a little more efficient next time. And I'll try to document it in pictures next time.

Now I need to go apple picking so I can bake that apple pie finally!


P.S.  I grabbed the camera once he got home and took this picture, just for you!  The lard on the left came out first and so on until you get to the lard on the right, which came out last.  The first lard is purer with less pork flavour.

Thursday, October 6, 2011

Scratching my Itch

I've tried blogging before but it just felt superfluous...  There was no purpose behind it.  I love sharing the funny details of life but, let's face it, not that many people want to read about my kids squawking like chickens as they practice piano scales.

I've been chatting with a group of women who are excited about feeding their families healthier foods.  I don't just mean more veggies and fibre, but homemade foods that have less manufactured processing.  I readily admit that I can't really get down to the basics unless I move to the country where I can have a farm with cattle and a huge garden, but I'd like to get as close to "from scratch" as I can with each meal that I prepare.

My hope is that as I venture further into "from scratch" territory, you'll come along with me to learn and laugh as I get messy doing what I love: feeding my family good, homemade food that will set them on a path of healthy eating for the rest of their lives.

~Wanda

p.s.  In my opinion, healthy eating is just as much about the scratchiness of the foods as it is about the healthiness.  So while I'll have some good healthy recipes, you'll also find lots of yummy sweets along the way.